Manual HDR - night shots


Posted 12/01/2010 - 19:52
Link
Yea much cheers for taking the time to document your methods. Very interesting techniques. And a great shot!
My only constructive criticism is the final result lacks some depth, as the subject of the picture is rather hidden by the bright complexity of the surrounding city.
I actually prefer this version:
although I do appreciate it's a complex scene
My only constructive criticism is the final result lacks some depth, as the subject of the picture is rather hidden by the bright complexity of the surrounding city.
I actually prefer this version:

although I do appreciate it's a complex scene
[i]Bodies: 1x K-5IIs, 2x K-5, Sony TX-5, Nokia 808
Lenses: Pentax DA 10-17mm ED(IF) Fish Eye, Pentax DA 14mm f/2.8, Sigma 17-70mm f/2.8, Pentax-A 28mm f/2.8, Sigma 30mm F1.4 EX DC, Pentax-A 50mm f/1.2, Pentax-A 50mm f/1.4, Pentax-FA 50mm f/1.4, Pentax-A 50mm f/1.7, Pentax DA* 50-135mm f/2.8, Sigma 135-400mm APO DG, and more ..
Flash: AF-540FGZ, Vivitar 283
Lenses: Pentax DA 10-17mm ED(IF) Fish Eye, Pentax DA 14mm f/2.8, Sigma 17-70mm f/2.8, Pentax-A 28mm f/2.8, Sigma 30mm F1.4 EX DC, Pentax-A 50mm f/1.2, Pentax-A 50mm f/1.4, Pentax-FA 50mm f/1.4, Pentax-A 50mm f/1.7, Pentax DA* 50-135mm f/2.8, Sigma 135-400mm APO DG, and more ..
Flash: AF-540FGZ, Vivitar 283

Posted 12/01/2010 - 20:26
Link
Hmmm, I get your drift. Much appreciated!
I do like that version, too (though it needs the final sharpening). I did think of it as the finished product when I thought of trying the local equalisation on this one.
And once I have applied this effect it is too late, I find it very hard to go back to the version without it.
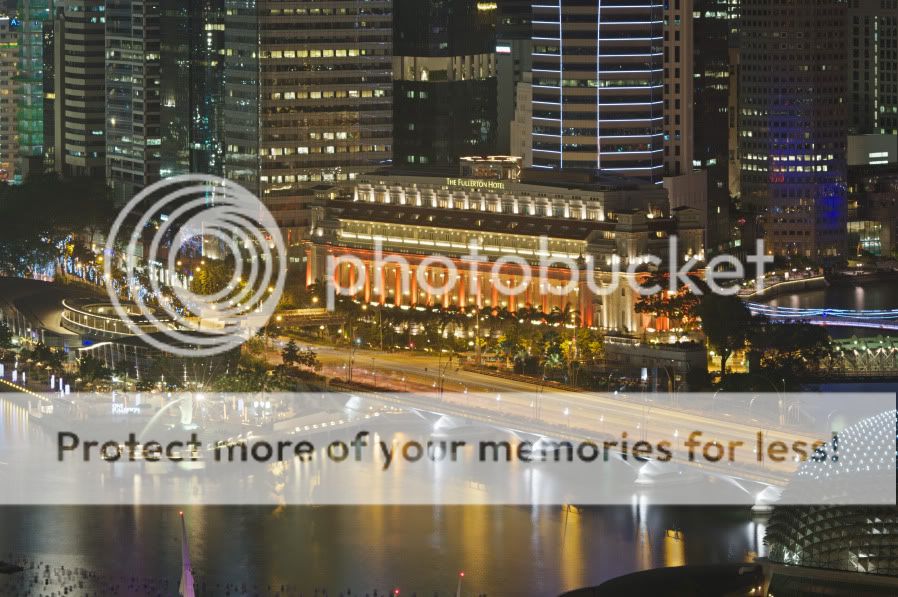
On the subject: While the Fullerton Hotel clearly is the focal point, one of the reasons of framing the picture in this way was exactly the bright and bustling city scenery. It also touches some of the well known sights such as the Esplanade (roof in the lower right corner), Esplanade bridge (the broad one), Anderson and Cavenagh bridge on the right and of course the water spouting Merlion.
Anderson and Esplanade bridge, by the way, are part of the Formula 1 circuit of Singapore.
Prieni
I do like that version, too (though it needs the final sharpening). I did think of it as the finished product when I thought of trying the local equalisation on this one.
And once I have applied this effect it is too late, I find it very hard to go back to the version without it.
On the subject: While the Fullerton Hotel clearly is the focal point, one of the reasons of framing the picture in this way was exactly the bright and bustling city scenery. It also touches some of the well known sights such as the Esplanade (roof in the lower right corner), Esplanade bridge (the broad one), Anderson and Cavenagh bridge on the right and of course the water spouting Merlion.
Anderson and Esplanade bridge, by the way, are part of the Formula 1 circuit of Singapore.
Prieni
How inappropriate to call this planet earth when it is quite clearly Ocean. - Arthur C. Clarke
Prieni's PPG page
Prieni's PPG page

Posted 12/01/2010 - 20:44
Link
Fascinating method which I may well try one day.
I'd be curious to see how running the scene through a dedicated HDR program like Photomatix Pro would compare to your more manual method.
Best wishes, Kris.
I'd be curious to see how running the scene through a dedicated HDR program like Photomatix Pro would compare to your more manual method.
Best wishes, Kris.
Kris Lockyear
It is an illusion that photos are made with the camera… they are made with the eye, heart and head. Henri Cartier-Bresson
Lots of film bodies, a couple of digital ones, too many lenses (mainly older glass) and a Horseman LE 5x4.
It is an illusion that photos are made with the camera… they are made with the eye, heart and head. Henri Cartier-Bresson
Lots of film bodies, a couple of digital ones, too many lenses (mainly older glass) and a Horseman LE 5x4.

Posted 12/01/2010 - 21:03
Link
Kris,
good question. As I recently downloaded the trial version of Photomatix Pro I gave it a spin:
[IMG]http://i156.photobucket.com/albums/t5/Prieni/howto%20night%20shot/_PRI7779And9moreEnhancer.jpg[/IMG]
Not too shabby I would say. And bear in mind that I have not much clue about the settings of it, yet.
I think this result is even better balanced. And it was a fair bit quicker than my manual approach. If I had to find fault with it I would say it is a tad too saturated. But not something that couldn't be adjusted in a whiff.
Thanks for tempting me to this trial, Kris.
Prieni
good question. As I recently downloaded the trial version of Photomatix Pro I gave it a spin:
[IMG]http://i156.photobucket.com/albums/t5/Prieni/howto%20night%20shot/_PRI7779And9moreEnhancer.jpg[/IMG]
Not too shabby I would say. And bear in mind that I have not much clue about the settings of it, yet.
I think this result is even better balanced. And it was a fair bit quicker than my manual approach. If I had to find fault with it I would say it is a tad too saturated. But not something that couldn't be adjusted in a whiff.
Thanks for tempting me to this trial, Kris.
Prieni
How inappropriate to call this planet earth when it is quite clearly Ocean. - Arthur C. Clarke
Prieni's PPG page
Prieni's PPG page

Posted 12/01/2010 - 21:36
Link
Good write up Prieni,
I was very interested in your methods when I saw these pics in the 'your photos' forum section, where you briefly mentioned this effect. I am glad you have gone in to more detail. Thanks
Regards
PaulM
I was very interested in your methods when I saw these pics in the 'your photos' forum section, where you briefly mentioned this effect. I am glad you have gone in to more detail. Thanks
Regards
PaulM
All cameras are equal but.....
Some are more equal than others
Some are more equal than others
Add Comment
To leave a comment - Log in to Pentax User or create a new account.




1469 posts
22 years
Rostock,
Germany
The method I use is basically a form of exposure stacking. From a series of exposures you pick the right exposure for the different parts of the shot.
First prerequisite is of course an interesting scene to shoot. As I was in Singapore for a holiday there was no shortage of that. The example here is the Fullerton Hotel at Marina Bay. I did shoot this scene on the very first evening from the hotel balcony.
First you need a stable tripod. Then select the scenery and tighten all the knobs on the tripod. Focus carefully (sometimes not easy in the dark).
I did a series of exposures, using aperture priority at A8.0 and -2.5 to +2.0 EV in steps of 0.5 EV. So I ended up with ten exposures:
This is the darkest:
And this the brightest:
All were developed to TIFFs in SilkyPix from the RAW images. The technique should work equally well with JPGs, though.
Next I loaded them up in Photoshop, starting with the darkest (-2.5 EV). Then I opened the -2.0 EV exposure and put it on the first one as a new layer. On top of that the -1.5 EV one and so on. So I end up with seeing the brightest one on top. I selected that top layer.
Now I selected all the bright parts in the image (Select, Color range, highlights works but CTRL+SHIFT+ALT+~ does the trick as well).
You see the selection "ant-street" around the bright parts. Now I used the Feather... command from the Select menu at 30 pixels and then I added a layer mask with "hide selection" option.
Here is what the result looks like when you use a pure black background layer. Remember, this was the brightest exposure and what you see here is the contribution to the finished product:
You can see how all the overexposed parts have disappeared.
While leaving the top layer (that I just worked on) enabled, I now select one layer down (the +1.5 EV exposure) and start the same process again (CTRL+SHIFT+ALT+~, then feather 28, i.e. a bit less than before, add layer mask "hide selection").
And in this way I work my way down the layers. The result then is this image:
Now is the right time to save that result and flatten the image (10 layers plus masks at the image size of the K20D does take some memory).
Almost ready...
Now I took the brightest exposure and loaded it into Corel PhotoPaint. This has an image adjust function called local equalisation, which I use quite frequently. It brings out the local contrast of an image. The result is an image that looks like drawn with colour pencils:
That is loaded into Photoshop again and put on top of the (now flattened) result. Layer mode switched to "soft light". Now I took back the opacity a bit (to around 40% for this image).
Saving, resizing and a bit of unsharp mask and the image is ready:
Of course you can apply a bit of curve correction, de-saturation (putting on the local equalisation layer sometimes over-saturates the result which might not be fitting for all images) or whatever you fancy.
It also is interesting to see what a bit of curve correction in one of the masks does for the image. That way you can fine-tune the lights a bit.
I had used this method before but only on three or four exposures. I probably didn't take bright enough ones also. This time round I am satisfied with the results. I will go out around home some time soon and test this method on my home turf.
Hope my ramblings make sense to you,
Prieni
P.S.: The images are a bit sharper when you click on them.
Prieni's PPG page