DA 10-17

Posted 26/12/2007 - 10:31
Link
Quote:
Not yet I' sorry to say - too many things to do and too little time....
Soon...
John,Not yet I' sorry to say - too many things to do and too little time....
Soon...
This is probably a daft question, but is the DA 10-17 a fisheye throughout its entire range or only down towards the 10mm end
Hyram
Bodies: K20D (2), K10D, Super A, ME Super, Auto 110 SLR, X70, Optio P70
Pentax Glass: DA* 300, DA* 60-250, DA* 50-135, DA* 16-50, DA 70 Ltd, FA 31 Ltd, DA 35 Ltd, DA 18-55 (2), DA 12-24, DA 10-17, M 200, A 35-70, M 40, M 28, Converter-A 2X-S, 1.4X-S, AF 1.7, Pentax-110 50, Pentax-110 24
Other Glass: Sigma 105 macro, Sigma-A APO 75-300
Flash: Metz 58 AF-1 P, Pentax AF160FC ringflash, Pentax AF280T
Bodies: K20D (2), K10D, Super A, ME Super, Auto 110 SLR, X70, Optio P70
Pentax Glass: DA* 300, DA* 60-250, DA* 50-135, DA* 16-50, DA 70 Ltd, FA 31 Ltd, DA 35 Ltd, DA 18-55 (2), DA 12-24, DA 10-17, M 200, A 35-70, M 40, M 28, Converter-A 2X-S, 1.4X-S, AF 1.7, Pentax-110 50, Pentax-110 24
Other Glass: Sigma 105 macro, Sigma-A APO 75-300
Flash: Metz 58 AF-1 P, Pentax AF160FC ringflash, Pentax AF280T

Posted 26/12/2007 - 10:42
Link
It's a fisheye with 180 degrees coverage at 10mm that does tend to straighten out as you zoom towards 17mm. But there's no way it ends up anything like rectilinear. This lens is a similar concept to ther previous fisheye zoom for film cameras (17-28mm).
If you need straight lines, the 12-24mm is the one.
If you need straight lines, the 12-24mm is the one.
Best regards, John

Posted 26/12/2007 - 13:25
Link
Quote:
This is probably a daft question, but is the DA 10-17 a fisheye throughout its entire range or only down towards the 10mm end
It's a fisheye all the way but more obvious at the wide end. If you shoot with a central horizon it can look un-fisheye like however anything in the foreground will still show distortion. I have the Sigma 10-20 as well and it gives very different results to the 10-17 although both are excellent.This is probably a daft question, but is the DA 10-17 a fisheye throughout its entire range or only down towards the 10mm end
This is a shot taken with the 10-17 but not showing much in the way of distortion:

Posted 27/12/2007 - 09:26
Link
Quote:
..............I have the Sigma 10-20 as well and it gives very different results to the 10-17 although both are excellent.
Thanks for the information. Thanks also to John...............I have the Sigma 10-20 as well and it gives very different results to the 10-17 although both are excellent.
Presumably having both lenses was intentional rather than buying one of them and then deciding that you really needed the other one ?
Hyram
Bodies: K20D (2), K10D, Super A, ME Super, Auto 110 SLR, X70, Optio P70
Pentax Glass: DA* 300, DA* 60-250, DA* 50-135, DA* 16-50, DA 70 Ltd, FA 31 Ltd, DA 35 Ltd, DA 18-55 (2), DA 12-24, DA 10-17, M 200, A 35-70, M 40, M 28, Converter-A 2X-S, 1.4X-S, AF 1.7, Pentax-110 50, Pentax-110 24
Other Glass: Sigma 105 macro, Sigma-A APO 75-300
Flash: Metz 58 AF-1 P, Pentax AF160FC ringflash, Pentax AF280T
Bodies: K20D (2), K10D, Super A, ME Super, Auto 110 SLR, X70, Optio P70
Pentax Glass: DA* 300, DA* 60-250, DA* 50-135, DA* 16-50, DA 70 Ltd, FA 31 Ltd, DA 35 Ltd, DA 18-55 (2), DA 12-24, DA 10-17, M 200, A 35-70, M 40, M 28, Converter-A 2X-S, 1.4X-S, AF 1.7, Pentax-110 50, Pentax-110 24
Other Glass: Sigma 105 macro, Sigma-A APO 75-300
Flash: Metz 58 AF-1 P, Pentax AF160FC ringflash, Pentax AF280T
Posted 27/12/2007 - 10:48
Link
Quote:
Presumably having both lenses was intentional rather than buying one of them and then deciding that you really needed the other one ?
Purchasing both was deliberate. The Sigma 10-20 and Pentax 10-17 produce very different results although their having similar focal lengths does seem to confuse some folks.
niblue wrote:
..............I have the Sigma 10-20 as well and it gives very different results to the 10-17 although both are excellent.
Thanks for the information. Thanks also to John...............I have the Sigma 10-20 as well and it gives very different results to the 10-17 although both are excellent.
Presumably having both lenses was intentional rather than buying one of them and then deciding that you really needed the other one ?
Posted 28/12/2007 - 13:36
Link
Well I have taken the plunge and ordered a DA 10-17 from Chris @ SRS.
It should arrive on New Year's Eve.
Having studied many photographs taken with both the DA 10-17 and the Sigma 10-20, I was drawn to the creative opportunities offered by the fish-eye.
It should arrive on New Year's Eve.
Having studied many photographs taken with both the DA 10-17 and the Sigma 10-20, I was drawn to the creative opportunities offered by the fish-eye.
Hyram
Bodies: K20D (2), K10D, Super A, ME Super, Auto 110 SLR, X70, Optio P70
Pentax Glass: DA* 300, DA* 60-250, DA* 50-135, DA* 16-50, DA 70 Ltd, FA 31 Ltd, DA 35 Ltd, DA 18-55 (2), DA 12-24, DA 10-17, M 200, A 35-70, M 40, M 28, Converter-A 2X-S, 1.4X-S, AF 1.7, Pentax-110 50, Pentax-110 24
Other Glass: Sigma 105 macro, Sigma-A APO 75-300
Flash: Metz 58 AF-1 P, Pentax AF160FC ringflash, Pentax AF280T
Bodies: K20D (2), K10D, Super A, ME Super, Auto 110 SLR, X70, Optio P70
Pentax Glass: DA* 300, DA* 60-250, DA* 50-135, DA* 16-50, DA 70 Ltd, FA 31 Ltd, DA 35 Ltd, DA 18-55 (2), DA 12-24, DA 10-17, M 200, A 35-70, M 40, M 28, Converter-A 2X-S, 1.4X-S, AF 1.7, Pentax-110 50, Pentax-110 24
Other Glass: Sigma 105 macro, Sigma-A APO 75-300
Flash: Metz 58 AF-1 P, Pentax AF160FC ringflash, Pentax AF280T
Posted 30/12/2007 - 20:27
Link
Today was the day we had some time, so we went up to Elterwater and tried out the 10-17mm. First some pictures, then a few comments:


I liked the lens a lot, it was great fun to use and seems to be sharp and contrasty. Chromatic abberation is well controlled in the ventre of the field but present in the outer areas. Perhaps with such a wide coverage this is not too surprising. It will be obvious to those who photograph trees against sky, but with many subjects will not be a problem.
I'm very happy with the purchase and the lens will get a fair bit of use.


I liked the lens a lot, it was great fun to use and seems to be sharp and contrasty. Chromatic abberation is well controlled in the ventre of the field but present in the outer areas. Perhaps with such a wide coverage this is not too surprising. It will be obvious to those who photograph trees against sky, but with many subjects will not be a problem.
I'm very happy with the purchase and the lens will get a fair bit of use.
Best regards, John
Posted 30/12/2007 - 21:08
Link
John,
Great photographs.
What time of day was the first one taken and can you let us have the technical info' for each one ?
Great photographs.
What time of day was the first one taken and can you let us have the technical info' for each one ?
Hyram
Bodies: K20D (2), K10D, Super A, ME Super, Auto 110 SLR, X70, Optio P70
Pentax Glass: DA* 300, DA* 60-250, DA* 50-135, DA* 16-50, DA 70 Ltd, FA 31 Ltd, DA 35 Ltd, DA 18-55 (2), DA 12-24, DA 10-17, M 200, A 35-70, M 40, M 28, Converter-A 2X-S, 1.4X-S, AF 1.7, Pentax-110 50, Pentax-110 24
Other Glass: Sigma 105 macro, Sigma-A APO 75-300
Flash: Metz 58 AF-1 P, Pentax AF160FC ringflash, Pentax AF280T
Bodies: K20D (2), K10D, Super A, ME Super, Auto 110 SLR, X70, Optio P70
Pentax Glass: DA* 300, DA* 60-250, DA* 50-135, DA* 16-50, DA 70 Ltd, FA 31 Ltd, DA 35 Ltd, DA 18-55 (2), DA 12-24, DA 10-17, M 200, A 35-70, M 40, M 28, Converter-A 2X-S, 1.4X-S, AF 1.7, Pentax-110 50, Pentax-110 24
Other Glass: Sigma 105 macro, Sigma-A APO 75-300
Flash: Metz 58 AF-1 P, Pentax AF160FC ringflash, Pentax AF280T

Posted 30/12/2007 - 21:20
Link
John,
Very nice!
Please tell me how you created #4.
Enjoy your lens!
Very nice!
Please tell me how you created #4.
Enjoy your lens!
Mac from Montreal
SP, SPII, SPF, PZ-10, P30, SFX, K110D, istDS, Optio 60, Z-10, H90, RZ10, I-10, f3.5 28mm, f1.8 55mm, f1.4 50mm, f3.5 135mm, f2.5 135mm, f4 50mm Macro, f4.5 80-200 F, f4 35-70, f3.5 28-80, f3.5 35-135, f3.5 18-55, f1.8 31mm Ltd., two Auto 110's, Auto 110 lenses and filters, tubes, bellows, Manfrottos and a sore back.
SP, SPII, SPF, PZ-10, P30, SFX, K110D, istDS, Optio 60, Z-10, H90, RZ10, I-10, f3.5 28mm, f1.8 55mm, f1.4 50mm, f3.5 135mm, f2.5 135mm, f4 50mm Macro, f4.5 80-200 F, f4 35-70, f3.5 28-80, f3.5 35-135, f3.5 18-55, f1.8 31mm Ltd., two Auto 110's, Auto 110 lenses and filters, tubes, bellows, Manfrottos and a sore back.
Posted 30/12/2007 - 21:35
Link
#1 1/1000sec f8 ISO 200 shot at around noon today. Darkened in Photoshop to add the mood.
#2 1/6sec f8 ISO 200 Only adjusted with Levels.
#3 1/90sec f8 ISO 200 Texture added via Filters>Texturiser>Sandstone
#4 1/125sec f8 ISO 200. Because the sun was very strong on the left of the image I used the right hand side flipped to even out the density. Go to Open>New and create a blank canvas to put the images in. Then select half of the image required using the Rectangular Marquee Tool. Ctrl+J will copy this area. Use the Move Tool to drag this copy into the blank canvas.
Then hit Ctrl+J again to copy the image in the canvas. Use Transform>Flip Horizontal to flip it and then the Move Tool to move the second image into register with the first. You can do this a pixel at a time using the up and down arrow keys, for perfect register. Then flatten the image and crop the area required, ready for resizing for print or web.
When you initially create the blank canvas it's a good idea to make it a suitable size ready to take the images that you are going to move into it. I generally make an A3 canvas to give plenty of room for the images. If the image is too small or too big when you drag it in you can easily change it using Ctrl+T to being up a Transform box.
Hope that helps. It takes ages to explain, but only seconds to do!
#2 1/6sec f8 ISO 200 Only adjusted with Levels.
#3 1/90sec f8 ISO 200 Texture added via Filters>Texturiser>Sandstone
#4 1/125sec f8 ISO 200. Because the sun was very strong on the left of the image I used the right hand side flipped to even out the density. Go to Open>New and create a blank canvas to put the images in. Then select half of the image required using the Rectangular Marquee Tool. Ctrl+J will copy this area. Use the Move Tool to drag this copy into the blank canvas.
Then hit Ctrl+J again to copy the image in the canvas. Use Transform>Flip Horizontal to flip it and then the Move Tool to move the second image into register with the first. You can do this a pixel at a time using the up and down arrow keys, for perfect register. Then flatten the image and crop the area required, ready for resizing for print or web.
When you initially create the blank canvas it's a good idea to make it a suitable size ready to take the images that you are going to move into it. I generally make an A3 canvas to give plenty of room for the images. If the image is too small or too big when you drag it in you can easily change it using Ctrl+T to being up a Transform box.
Hope that helps. It takes ages to explain, but only seconds to do!
Best regards, John

Posted 30/12/2007 - 23:34
Link
My 10-17 should appear on my doorstep tomorrow, if the order stated the truth - I shall post some images on this thread to show you what I think of it when i have the time.
Posted 31/12/2007 - 03:13
Link
Many thanks John, 'preciate it!
Cheers
Cheers
Mac from Montreal
SP, SPII, SPF, PZ-10, P30, SFX, K110D, istDS, Optio 60, Z-10, H90, RZ10, I-10, f3.5 28mm, f1.8 55mm, f1.4 50mm, f3.5 135mm, f2.5 135mm, f4 50mm Macro, f4.5 80-200 F, f4 35-70, f3.5 28-80, f3.5 35-135, f3.5 18-55, f1.8 31mm Ltd., two Auto 110's, Auto 110 lenses and filters, tubes, bellows, Manfrottos and a sore back.
SP, SPII, SPF, PZ-10, P30, SFX, K110D, istDS, Optio 60, Z-10, H90, RZ10, I-10, f3.5 28mm, f1.8 55mm, f1.4 50mm, f3.5 135mm, f2.5 135mm, f4 50mm Macro, f4.5 80-200 F, f4 35-70, f3.5 28-80, f3.5 35-135, f3.5 18-55, f1.8 31mm Ltd., two Auto 110's, Auto 110 lenses and filters, tubes, bellows, Manfrottos and a sore back.

Posted 31/12/2007 - 07:33
Link
Quote:
#4 1/125sec f8 ISO 200. Because the sun was very strong on the left of the image I used the right hand side flipped to even out the density. Go to Open>New and create a blank canvas to put the images in. Then select half of the image required using the Rectangular Marquee Tool. Ctrl+J will copy this area. Use the Move Tool to drag this copy into the blank canvas.
Then hit Ctrl+J again to copy the image in the canvas. Use Transform>Flip Horizontal to flip it and then the Move Tool to move the second image into register with the first. You can do this a pixel at a time using the up and down arrow keys, for perfect register. Then flatten the image and crop the area required, ready for resizing for print or web.
When you initially create the blank canvas it's a good idea to make it a suitable size ready to take the images that you are going to move into it. I generally make an A3 canvas to give plenty of room for the images. If the image is too small or too big when you drag it in you can easily change it using Ctrl+T to being up a Transform box.
Hope that helps. It takes ages to explain, but only seconds to do!
Ahh - hadn't even noticed that it was a "homemade" shot. Very nice indeed. It sure fooled my eye when I saw it the first time. Well done.
#4 1/125sec f8 ISO 200. Because the sun was very strong on the left of the image I used the right hand side flipped to even out the density. Go to Open>New and create a blank canvas to put the images in. Then select half of the image required using the Rectangular Marquee Tool. Ctrl+J will copy this area. Use the Move Tool to drag this copy into the blank canvas.
Then hit Ctrl+J again to copy the image in the canvas. Use Transform>Flip Horizontal to flip it and then the Move Tool to move the second image into register with the first. You can do this a pixel at a time using the up and down arrow keys, for perfect register. Then flatten the image and crop the area required, ready for resizing for print or web.
When you initially create the blank canvas it's a good idea to make it a suitable size ready to take the images that you are going to move into it. I generally make an A3 canvas to give plenty of room for the images. If the image is too small or too big when you drag it in you can easily change it using Ctrl+T to being up a Transform box.
Hope that helps. It takes ages to explain, but only seconds to do!
Posted 05/01/2008 - 16:02
Link
I finally got round to trying de-fishing software (trial version of PT-lens):
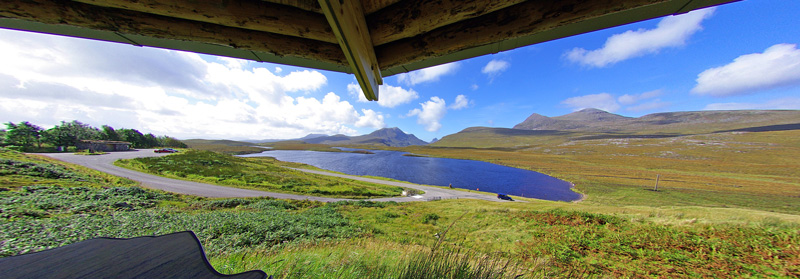
The results aren't bad at all but notice the "purple fringing" CA in the trees on the left (pt lens can fix lateral CA's but not that kind) which is much more noticeable than in the original shot:
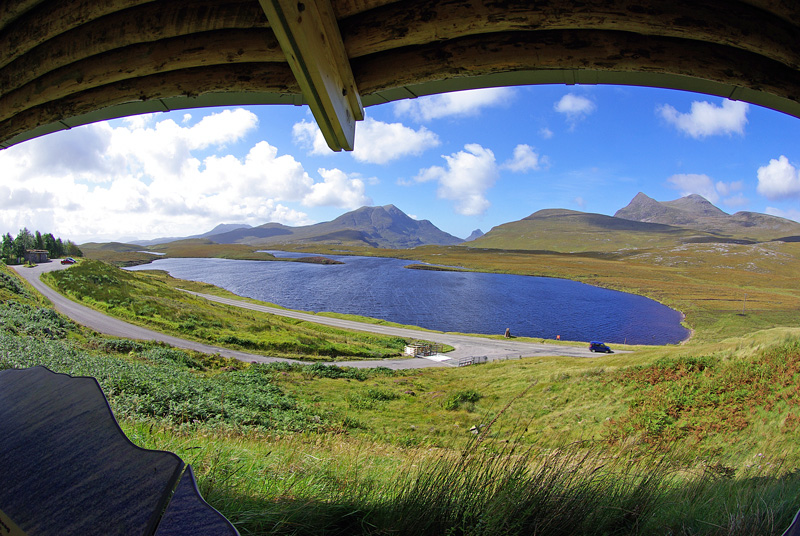

The results aren't bad at all but notice the "purple fringing" CA in the trees on the left (pt lens can fix lateral CA's but not that kind) which is much more noticeable than in the original shot:

Add Comment
To leave a comment - Log in to Pentax User or create a new account.




24425 posts
24 years
Tyldesley,
Manchester
Soon...