O-RC1 battery replacement.

Posted 14/12/2020 - 21:49
Link
Thanks for posting Gareth...
K-1Gripped K-1 ungripped K-5ii K7 Various lenses
Stuart..
Stuart..

Posted 16/12/2020 - 16:55
Link
Result, good for you!

Posted 17/12/2020 - 12:09
Link
In this day and age it's hard to believe that such a device is produced that is supposed to be thrown away when the battery dies, rather than simply replacing the battery. I understand it's easier to make it waterproof that way, but surely it can't be more than a case of an extra o-ring to waterproof a battery compartment.
Pentax hybrid user - Digital K3, film 645 and 35mm SLR and Pentax (&other) lenses adapted to Fuji X and Panasonic L digital
Fan of DA limited and old manual lenses
Fan of DA limited and old manual lenses
Posted 17/12/2020 - 13:36
Link
Jonathan-Mac wrote:
In this day and age it's hard to believe that such a device is produced that is supposed to be thrown away when the battery dies
Agreed. But there's a lot of it about. Just looking at what's lying around here, the MS Surface (on which this is being typed), smartphone and iPod Classic all have batteries that aren't user-replacable (unless you're Gareth, perhaps ). OK, they're rechargable, but even rechargables eventually die. Presumably manufacturers work out a typical rate of use, if they reckon most people will have replaced/destroyed/lost/abandoned the thing before the battery dies then it isn't worth the additional cost of making the battery user-replacable.In this day and age it's hard to believe that such a device is produced that is supposed to be thrown away when the battery dies
Steve

Posted 17/12/2020 - 13:45
Link
I have a Maxsima remote that I have used for about 5 years now, I have just changed the battery (just slide in) for the first time (CR 2032 lithium) no problems at all. Works on K5, K3ii, K70 and K1, bought I think for about a tenner. Funny its marked "for Nikon"
Just passing thru

Posted 17/12/2020 - 13:56
Link
Thank you for the "How To" Gareth - this is useful to know.
A more common example is electric tooth brushes: my Oral B model is just five years old and now requires charging most days. I'm persevering with it as I don't want to add to the mountain of e-waste.
Jonathan-Mac wrote:
In this day and age it's hard to believe that such a device is produced that is supposed to be thrown away when the battery dies, rather than simply replacing the battery. I understand it's easier to make it waterproof that way, but surely it can't be more than a case of an extra o-ring to waterproof a battery compartment.
I agree that we really should not be allowing the sale of products that cannot have their battery replaced. There will always be edge-cases, but, in general, batteries should be replaceable. Non-replaceable batteries are, unfortunately, still a common design. In my line of work I deal with a number of products that have an embedded Lithium battery with a lifespan of ten years or so, after which you have to dispose of the device. In this day and age it's hard to believe that such a device is produced that is supposed to be thrown away when the battery dies, rather than simply replacing the battery. I understand it's easier to make it waterproof that way, but surely it can't be more than a case of an extra o-ring to waterproof a battery compartment.
A more common example is electric tooth brushes: my Oral B model is just five years old and now requires charging most days. I'm persevering with it as I don't want to add to the mountain of e-waste.
Nigel.
Getting older and grumpier. Taking longer to decide which lens to use today.
K5 with auto-everything lenses
A collection of manual primes to keep me in touch with the pleasures of doing it old-school.
Getting older and grumpier. Taking longer to decide which lens to use today.
K5 with auto-everything lenses
A collection of manual primes to keep me in touch with the pleasures of doing it old-school.
Posted 20/12/2020 - 11:37
Link
Hi Gareth, Just about to attempt this little application.
"Then there is a sticker holding the top of the battery in place that needs removed." Are we talking of the battery negative terminal here ? At first sight it seems to be well and truly stuck to battery. possibly soldered ? Could you tell me. How did you remove it ?
"Then there is a sticker holding the top of the battery in place that needs removed." Are we talking of the battery negative terminal here ? At first sight it seems to be well and truly stuck to battery. possibly soldered ? Could you tell me. How did you remove it ?
K-1Gripped K-1 ungripped K-5ii K7 Various lenses
Stuart..
Stuart..

Posted 20/12/2020 - 20:24
Link
stub wrote:
Hi Gareth, Just about to attempt this little application.
"Then there is a sticker holding the top of the battery in place that needs removed." Are we talking of the battery negative terminal here ? At first sight it seems to be well and truly stuck to battery. possibly soldered ? Could you tell me. How did you remove it ?
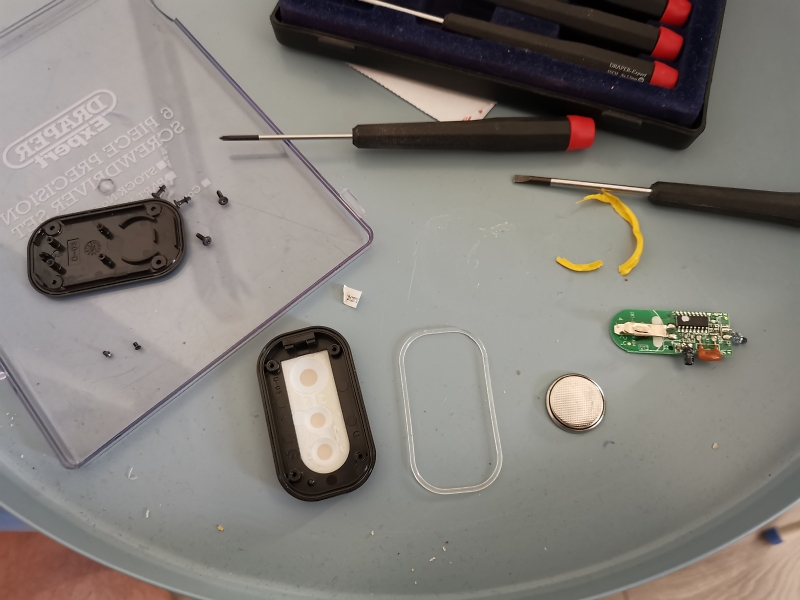
When you take the remote apart and you can see the PCB and the battery you'll be looking at the negative terminal of the battery with the yellow plastic wrap around the outside. There is a small white sticker holding the PCB battery terminal to the battery. Its shown in my pic just above the weather seal. This just peels off. The bottom of the battery is stuck to the PCB with some very strong and hefty double sided tape.
Hi Gareth, Just about to attempt this little application.
"Then there is a sticker holding the top of the battery in place that needs removed." Are we talking of the battery negative terminal here ? At first sight it seems to be well and truly stuck to battery. possibly soldered ? Could you tell me. How did you remove it ?
Gareth Williams ARPS
My outfit: K1ii - Pentax D FA 24-70mm f2.8 - Pentax DA* 300mm f4 - Pentax modified DA* 60-250mm f4 - Irix 15mm Firefly - Pentax FA 35mm - FA 50mm f1.4 - Tamron SP 90mm macro - Pentax AF 540 FGZ II
Welsh Photographer
Flickr
Instagram
My PPG
Foundation NFT
My outfit: K1ii - Pentax D FA 24-70mm f2.8 - Pentax DA* 300mm f4 - Pentax modified DA* 60-250mm f4 - Irix 15mm Firefly - Pentax FA 35mm - FA 50mm f1.4 - Tamron SP 90mm macro - Pentax AF 540 FGZ II
Welsh Photographer
Flickr
My PPG
Foundation NFT

Posted 27/04/2025 - 22:23
Link
cardiffgareth wrote:
Just replaced my battery as it was starting to be intermediate working. I've read you can't change the batteries in these so I had nothing to loose.
4 screws in the back. Remove these and carefully prize apart. The front buttons are stuck to the PCB so you'll need to carefully pull apart. Once this is done, 2 smaller screws hold the PCB to the main remote body. The battery will then become visible. There is a yellow plastic surround that's stuck to the bottom of the PCB, I had to break this plastic and 'unwrap' the plastic off the battery. Then there is a sticker holding the top of the battery in place that needs removed. Its a 2025 battery and once replaced I used Frog tape to hold the new battery in place. Then reassemble is the reverse of above. New battery works a treat
Thanks Gareth you’re a star 👍👍👍
Just replaced my battery as it was starting to be intermediate working. I've read you can't change the batteries in these so I had nothing to loose.
4 screws in the back. Remove these and carefully prize apart. The front buttons are stuck to the PCB so you'll need to carefully pull apart. Once this is done, 2 smaller screws hold the PCB to the main remote body. The battery will then become visible. There is a yellow plastic surround that's stuck to the bottom of the PCB, I had to break this plastic and 'unwrap' the plastic off the battery. Then there is a sticker holding the top of the battery in place that needs removed. Its a 2025 battery and once replaced I used Frog tape to hold the new battery in place. Then reassemble is the reverse of above. New battery works a treat

Daronl
Add Comment
To leave a comment - Log in to Pentax User or create a new account.




3434 posts
11 years
Barrybados
4 screws in the back. Remove these and carefully prize apart. The front buttons are stuck to the PCB so you'll need to carefully pull apart. Once this is done, 2 smaller screws hold the PCB to the main remote body. The battery will then become visible. There is a yellow plastic surround that's stuck to the bottom of the PCB, I had to break this plastic and 'unwrap' the plastic off the battery. Then there is a sticker holding the top of the battery in place that needs removed. Its a 2025 battery and once replaced I used Frog tape to hold the new battery in place. Then reassemble is the reverse of above. New battery works a treat
My outfit: K1ii - Pentax D FA 24-70mm f2.8 - Pentax DA* 300mm f4 - Pentax modified DA* 60-250mm f4 - Irix 15mm Firefly - Pentax FA 35mm - FA 50mm f1.4 - Tamron SP 90mm macro - Pentax AF 540 FGZ II
Welsh Photographer
Flickr
Instagram
My PPG
Foundation NFT